This topic provides instructions on setting up your application for design time, options for using CSS in production and an overview on creating or customizing a theme.
This topic contains the following sections:
Ignite UI for jQuery™ utilizes the jQuery UI CSS Framework for styling and theming purposes. Infragistics, Infragistics 2012, metro and iOS are jQuery UI themes provided by Infragistics for use in your application. The default Twitter Bootstrap theme along with three custom ones – Yeti, Superhero and Flatly, compiled for usage with jQuery UI and Ignite UI for jQuery controls are also available. This document shows how to setup your application for design time and overviews, how to create or customize a theme, and provides options for using Ignite UI for jQuery CSS in production.
Provided with Ignite UI for jQuery is a set of combined and minified themes for use in a production environment. These minified versions reduce the readability of the CSS but in production allow for faster download of resources across the network.
CSS files are reorganized in the structure described below:
Each theme’s css ends with theme.css extension.

It contains a structure and a themes folder.

Under structure directory there are the following folders and structures:
css\structure\images
modules - all of the widget specific files are under modules. They reference images from one level up: ../images/IMAGE_NAME.gif.
css\structure\modules
combined css file that is named infragistics.css.
css\structure\infragistics.css
During combining process all of the image references were corrected to reference the image folder off of the current location:
images/IMAGE_NAME.gif

All the themes are located in the installed directory within the css folder.
If you have chosen the typical installation of Ignite UI for jQuery 20.1, you can find the css resources under the path below:
C:\Program Files (x86)\Infragistics\2020.1\Ignite UI for jQuery\css
To add the themes to your application, copy the whole css folder (including ‘structure’ and ‘themes’ directories) into your site’s file location.
Custom Bootstrap themes exported from the Bootstrap Theme Generator web application should be copied to the ‘themes’ subdirectory.
Note: When using Infragistics Loader, the folder structure must be preserved. Thus the loader will work as expected. If some of the themes are not used they can be deleted, but the structure should remain the same.
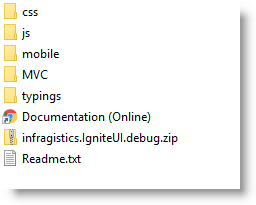
The following screenshot represents the folder structure.

This topic takes you step-by-step toward adding the required themes in your website. The following is a conceptual overview of the process:
The following steps demonstrate how to add the required themes in your website.
Include the Infragistics theme file in the code.:
The following code snippet includes the Infragistics theme in your file.
In HTML:
<link href="{IG Resources root}/css/themes/infragistics/infragistics.theme.css" rel="stylesheet" type="text/css" />
In ASPX:
<%@ Import Namespace="Infragistics.Web.Mvc" %>
<!DOCTYPE html>
<html>
<head id="Head1" runat="server">
<link href="<%= Url.Content("{IG Resources root}/css/themes/infragistics/infragistics.theme.css ") %>” rel="stylesheet" type="text/css" />
Include the Infragistics structure file in the code.
The following code snippet includes the Infragistics structure file in your file.
In HTML:
<link href="{IG Resources root}/css/structure/infragistics.css" rel="stylesheet" type="text/css" />
In ASPX:
<link href="<%= Url.Content("{IG Resources root}/css/structure/infragistics.css") %>” rel="stylesheet" type="text/css" />
Infragistics offers the following themes you can include in your website:
When using a theme other than the provided ones, Infragistics widgets have some additional styling points that may need customization to achieve a complete design depending on the widget’s enabled features and theme. Themes obtained from the Bootstrap Theme Generator web application are full-fledged and can be used without additional customization.
The Infragistics theme is a custom theme which includes all of the styles usually found in a jQuery UI theme. This theme may be replaced by a different theme but for the jQuery widgets to display correctly, a reference to the file {IG Resources root}\css\structure\infragistics.css is required.
Metro theme is implementation of the clean, modern and fast Metro design language. This theme may be replaced by a different theme but for the jQuery widgets to display correctly, a reference to the file {IG Resources root}\css\structure\infragistics.css is required.
The iOS theme is implementation of the well-known iOS look and feel. This theme may be replaced by a different theme but for the jQuery widgets to display correctly, a reference to the file {IG Resources root}\css\structure\infragistics.css is required.
The Bootstrap themes for jQuery UI and Ignite UI for jQuery are generated from the popular Bootstrap themes with the same names. The careful process of utilizing their look and feel for a theme following the jQuery UI CSS framework conventions has been automated with the Bootstrap Theme Generator web application. It provides the functionality of exporting almost every Bootstrap theme available in LESS for styling Ignite UI for jQuery and jQuery UI widgets. A reference to the file {IG Resources root}\css\structure\infragistics.css is required.
For setting cssPath and scriptPath options you should set a path, which is relative to the page that instantiates the loader.
In Javascript:
$.ig.loader({
            scriptPath: '{IG Resources root}/js/',
            cssPath: '{IG Resources root}/css/',
            resources: 'igCombo'
       });
For setting different theme you can use the theme option, as in the code snippet below.
In Javascript:
$.ig.loader({
            scriptPath: "{IG Resources root}/js/",
            cssPath: "{IG Resources root}/css/",
            resources: "igGrid.*",
            theme: "metro"
      });
For more information regarding the Infragistics loader, refer to the topic Using JavaScript Resouces in Ignite UI for jQuery.
Note: For custom themes use the name of the theme’s directory.
ThemeRoller is a tool provided by jQuery UI which facilitates the creation of custom themes that are compatible with jQuery UI widgets. Many pre-built themes can be downloaded and incorporated into your website. The Infragistics jQuery widgets support the use of ThemeRoller themes.
In addition to incorporating individual themes, the jQuery UI Theme Switcher widget can be used to dynamically change pre-built jQuery UI themes dynamically in the browser.
Note: The Infragistics Theme and Metro Theme cannot be used in conjunction with other ThemeRoller themes because
infragistics.theme.css, as well as any other css with final overrides, is not compatible with ThemeRoller. When application uses ThemeRoller, then the only permitted CSS file isjquery.ui.theme.css. To fix this through the loader, can set the theme option to "" (empty string). That way the loader will not attempt to load the default theme (which isinfragisticsfor the jQuery widgets).
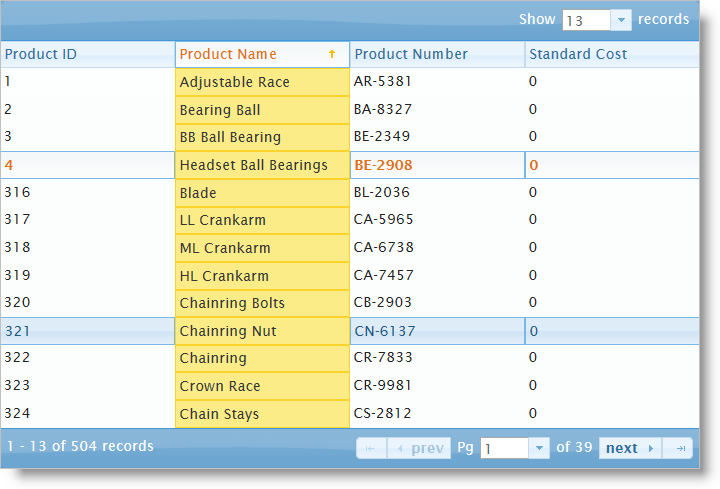
The following screenshot is a preview of the final result.

The following steps demonstrate how to add Redmond theme in your application.
Add Redmond theme to your themes directory
Drag this directory into the themes directory of your website.

Update the CSS links to replace the Infragistics theme with the Redmond theme
Add CSS reference to Redmond theme.
In HTML:
<link href="/css/themes/redmond/jquery-ui-1.8.13.custom.css" rel="stylesheet" type="text/css" />
In ASPX:
 <%@ Import Namespace="Infragistics.Web.Mvc" %>
 <!DOCTYPE html>
 <html>
 <head runat="server">
 <link href="<%= Url.Content("~css/themes/redmond/jquery-ui-1.8.13.custom.css") %>” rel="stylesheet" type="text/css" />
Add CSS reference to structure theme.
In HTML:
<link href="/css/structure/infragistics.css" rel="stylesheet" type="text/css" />
In ASPX:
<link href="<%= Url.Content("~css/structure/infragistics.css") %>" rel="stylesheet" type="text/css" />
The Bootstrap Theme Generator is a web tool provided by Infragistics which facilitates the export of themes created for the Bootstrap CSS framework to themes usable by Ignite UI for jQuery and jQuery UI widgets. In addition it allows for customization of every property of the theme and displays previews showing the end result.
This topic takes you step-by-step toward using the Bootstrap Theme Generator for exporting Bootstrap themes and adding them to your website. The following is a conceptual overview of the process:
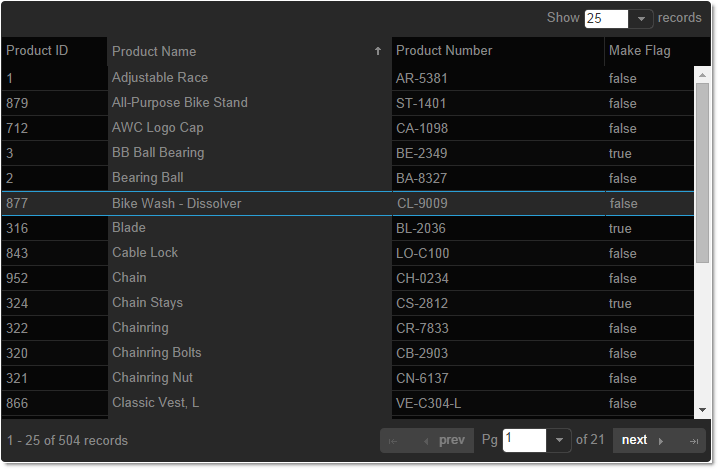
The following screenshot is a preview of the final result with the premise that the chosen theme is Cyborg.

The following steps demonstrate how to export and add a Bootstrap theme in your application.
Updating the CSS links to replace the Infragistics Theme with the chosen theme

Add CSS reference to the exported theme. The code samples below assume the chosen theme is Metro and the theme folder has the same name.
In HTML:
<link href="/css/themes/metro/infragistics.theme.css" rel="stylesheet" type="text/css" />
In ASPX:
<%@ Import Namespace="Infragistics.Web.Mvc" %>
<!DOCTYPE html>
<html>
<head runat="server">
<link href="<%= Url.Content("~css/themes/metro/infragistics.theme.css") %>” rel="stylesheet" type="text/css" />
Add CSS reference to structure theme.
In HTML:
<link href="/css/structure/infragistics.css" rel="stylesheet" type="text/css" />
In ASPX:
<link href="<%= Url.Content("~css/structure/infragistics.css") %>” rel="stylesheet" type="text/css" />
To verify the result, run the web page
Run the page and verify the igGrid renders with the chosen theme.
All listed themes are hosted on the Infragistics CDN.
The benefits of using a CDN are numerous. For more information, refer to the dedicated help topic Infragistics Content Delivery Network (CDN) for Ignite UI for jQuery. For more information on referencing files from the CDN, see the Infragistics Content Delivery Network (CDN) for Ignite UI for jQuery topic.
In HTML:
<link href="http://cdn-na.infragistics.com/igniteui/2020.1/latest/css/themes/infragistics/infragistics.theme.css" rel="stylesheet" type="text/css" />

<link href="http://cdn-na.infragistics.com/igniteui/2020.1/latest/css/structure/infragistics.css" rel="stylesheet" type="text/css" />
The following topics provide additional information related to this topic.
JavaScript Files in Ignite UI for jQuery: This topic is a reference to the JavaScript files required to work with the controls included in Ignite UI for jQuery™.
Using JavaScript Resouces in Ignite UI for jQuery: This topic explains how to manage the required resources to work with the Ignite UI for jQuery within a Web application.
Infragistics Content Delivery Network (CDN) for Ignite UI for jQuery: Instructions on using Infragistics Content Delivery Network (CDN) in Ignite UI for jQuery.
Using Gradient Colors in Data Visualizations: This topic explains how to apply gradient colors to the data visuals in Ignite UI for jQuery™ controls.
Applying the New Style (igDataChart): This topic demonstrates how to apply styles and themes to the chart.
Using Ignite UI for jQuery with Bootstrap : This topic explains how Ignite UI for jQuery and Bootstrap work together
View on GitHub