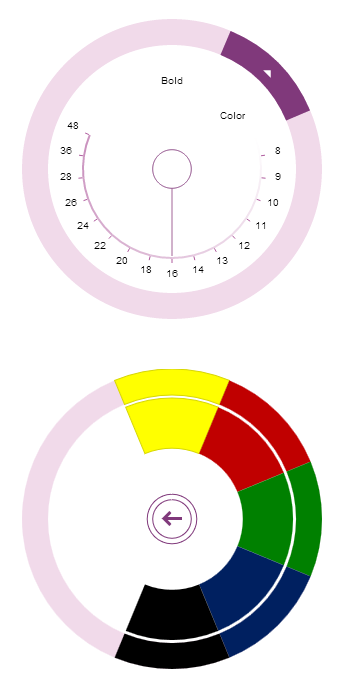
This topic demonstrates, with code examples, how to add the igRadialMenu™ control to an HTML page.
The following topics are prerequisites to understanding this topic:
igRadialMenu Features: This topic explains the features supported by the control from developer perspective.
igRadialMenu Visual Elements: This topic provides an overview of the visual elements of the control.
This topic contains the following sections:
To add igRadialMenu control to a web page requires an HTML element, a <div> to serve as the base for the instantiation. The basic configuration of the igRadialMenu requires providing its dimensions and also defining some menu items.
The following table summarizes the requirements for using the igRadialMenu control.
| Required Resources | Description | What you need to do… | ||||||||||||
|---|---|---|---|---|---|---|---|---|---|---|---|---|---|---|
| jQuery and jQuery UI JavaScript resources | Ignite UI for jQuery™ is built on top of the following frameworks: | Add script references to both libraries in the section of your page. | ||||||||||||
General igRadialMenu JavaScript Resources
|
The igRadialMenu control depends on functionality distributed across several files in the Ignite UI for jQuery Library. You can load the required resources in one of the following ways:
igRadialMenu control. These resources need to be referred to explicitly if you chose not to use igLoader or
the combined files.
|
Add one of the following:
|
Following are the general conceptual steps for adding igRadialMenu to an HTML page.
Create a target element for storing the igRadialMenu control.
Instantiate the igRadialMenu control.
Configure the basic rendering options.
Add a button item (optional)
Add a color item (optional)
Add a numeric gauge item (optional)
This procedure adds an instance of the igRadialMenu to an HTML page, configure its dimensions and add some menu items.
The following screenshot is a preview of the result with all optional steps completed.

To complete the procedure, you need the required JavaScript and CSS files referenced on the HTML page.
Following is the full code for this procedure.
In HTML:
<!DOCTYPE html>
<html>
<head>
    <!-- Ignite UI for jQuery Required Combined CSS Files -->
    <link href="../../igniteui/css/themes/infragistics/infragistics.theme.css" rel="stylesheet" />
    <link href="../../igniteui/css/structure/modules/infragistics.ui.radialmenu.css" rel="stylesheet"/>

    <!-- jQuery Files -->
    <script type="text/javascript" src="../../js/jquery.min.js"></script>
    <script type="text/javascript" src="../../js/jquery-ui.js"></script>

    <!-- Infragistics Shared JavaScript Files -->
    <script src="../../igniteui/js/modules/infragistics.util.js"></script>
    <script src="../../igniteui/js/modules/infragistics.util.jquery.js"></script>
    <script src="../../igniteui/js/modules/infragistics.ext_core.js"></script>
    <script src="../../igniteui/js/modules/infragistics.ext_collections.js"></script>
    <script src="../../igniteui/js/modules/infragistics.ext_collectionsextended.js"></script>
    <script src="../../igniteui/js/modules/infragistics.ext_ui.js"></script>
    <script src="../../igniteui/js/modules/infragistics.dv_core.js"></script>
    <script src="../../igniteui/js/modules/infragistics.dv_interactivity.js"></script>
    <script src="../../igniteui/js/modules/infragistics.dv_jquerydom.js"></script>
    <script src="../../igniteui/js/modules/infragistics.ui.widget.js"></script>

    <!-- Radial Menu Required JavaScript Files -->
    <script src="../../igniteui/js/modules/infragistics.radialmenu.js"></script>
    <script src="../../igniteui/js/modules/infragistics.ui.radialmenu.js"></script>
</head>
<body>
</body>
</html>
The following steps demonstrate how to add igRadialMenu to an HTML page.
Create a target element for storing the igRadialMenu control
Create a <div> element within the HTML body on which to instantiate the igRadialMenu control.
In HTML:
 <body>
     <!-- Target element for the igRadialMenu -->
     <div id="radialMenu"></div>
 </body>
Instantiate the igRadialMenu control
Use the target element defined in step 1 to select and instantiate the igRadialMenu control.
In HTML:
 <script type="text/jscript">
 $(function () {
     $("#radialMenu").igRadialMenu({
     });
 });
 </script>
Configure basic rendering options
Configure the width and height options when instantiating the igRadialMenu.
In JavaScript:
 $("#radialMenu").igRadialMenu({
     width: "300px",
     height: "300px"
 });
Add a button item (optional)
Define a button item in the igRadialMenu.
In JavaScript:
 $("#radialMenu").igRadialMenu({
     items:
         [
             {
                 name: "button1",
                 header: "Bold",
                 click: function () {
                     // add code for handling the click event
                 }
             }
         ]
 });
Add a color item (optional)
Define a color item with color well Sub-Items in the igRadialMenu.
In JavaScript:
 $("#radialMenu").igRadialMenu({
     items:
         [
             {
                 type: "coloritem",
                 header: "Color",
                 items:
                     [
                         {
                             type: "colorWell",
                             color: "#FFFF00"
                         },
                         {
                             type: "colorWell",
                             color: "#C00000"
                         },
                         {
                             type: "colorWell",
                             color: "#008000"
                         },
                         {
                             type: "colorWell",
                             color: "#002060"
                         },
                         {
                             type: "colorWell",
                             color: "#000000"
                         }
                     ]
             }
         ]
 });
Add a numeric gauge item (optional)
Define a numeric gauge item in the igRadialMenu.
In JavaScript:
 $("#radialMenu").igRadialMenu({
     items:
         [
             {
                 type: "numericgauge",
                 wedgeSpan: "5",
                 ticks: "8,9,10,11,12,13,14,16,18,20,22,24,26,28,36,48",
                 value: "16"
             }
         ]
 });
Following is the full code for this procedure.
In HTML:
<!DOCTYPE html>
<html>
<head>

    <!-- Ignite UI for jQuery Required Combined CSS Files -->
    <link href="../../igniteui/css/themes/infragistics/infragistics.theme.css" rel="stylesheet" />
    <link href="../../igniteui/css/structure/modules/infragistics.ui.radialmenu.css" rel="stylesheet"/>

    <!-- jQuery Files -->
    <script type="text/javascript" src="../../js/jquery.min.js"></script>
    <script type="text/javascript" src="../../js/jquery-ui.js"></script>

    <!-- Infragistics Shared JavaScript Files -->
    <script src="../../igniteui/js/modules/infragistics.util.js"></script>
    <script src="../../igniteui/js/modules/infragistics.util.jquery.js"></script>
    <script src="../../igniteui/js/modules/infragistics.ext_core.js"></script>
    <script src="../../igniteui/js/modules/infragistics.ext_collections.js"></script>
    <script src="../../igniteui/js/modules/infragistics.ext_collectionsextended.js"></script>
    <script src="../../igniteui/js/modules/infragistics.ext_ui.js"></script>
    <script src="../../igniteui/js/modules/infragistics.dv_core.js"></script>
    <script src="../../igniteui/js/modules/infragistics.dv_interactivity.js"></script>
    <script src="../../igniteui/js/modules/infragistics.dv_jquerydom.js"></script>
    <script src="../../igniteui/js/modules/infragistics.ui.widget.js"></script>

    <!-- Radial Menu Required JavaScript Files -->
    <script src="../../igniteui/js/modules/infragistics.radialmenu.js"></script>
    <script src="../../igniteui/js/modules/infragistics.ui.radialmenu.js"></script>

<script type="text/jscript">
$(function () {
    $("#radialMenu").igRadialMenu({
        width: "300px",
        height: "300px",
        items:
        [
            {
                name: "button1",
                header: "Bold",
                click: function () {
                    // add code for handling the click event
                }
            },
            {
                type: "coloritem",
                header: "Color",
                items:
                [
                    {
                        type: "colorwell",
                        color: "#FFFF00"
                    },
                    {
                        type: "colorwell",
                        color: "#C00000"
                    },
                    {
                        type: "colorwell",
                        color: "#008000"
                    },
                    {
                        type: "colorwell",
                        color: "#002060"
                    },
                    {
                        type: "colorwell",
                        color: "#000000"
                    }
                ]
            },
            {
                type: "numericgauge",
                wedgeSpan: "5",
                ticks: "8,9,10,11,12,13,14,16,18,20,22,24,26,28,36,48",
                value: "16"
            }
        ]
    });
});
</script>
</head>
<body>
    <!-- Target element for the igRadialMenu -->
    <div id="radialMenu"></div>
</body>
</html>
The following topics provide additional information related to this topic.
Adding igRadialMenu to an ASP.NET MVC Application: This topic demonstrates, with code examples, how to add the igRadialMenu to an ASP.NET MVC application using Ignite UI for MVC.
igRadialMenu Configuration Overview: This topic explains how to configure the igRadialMenu control.
View on GitHub