This topic demonstrates, with code examples, how to add the igRadialMenu™ to an ASP.NET MVC application using Ignite UI for MVC.
The following table lists the concepts and topics required as a prerequisite to understanding this topic.
Concepts
Topics
Adding Controls to an MVC Project: This topic explains how to get started with Ignite UI for jQuery™ components in an ASP.NET MVC application.
igRadialMenu Features: This topic explains the features supported by the control from developer perspective.
igRadialMenu Visual Elements: This topic provides an overview of the visual elements of the control.
This topic contains the following sections:
The igRadialMenu control can be added to an ASP.NET MVC view using the Ignite UI for MVC HTML helper.
When instantiating the igRadialMenu control, there are several helper methods that should be set for basic renderings including the following:
| Helper Method | Purpose |
|---|---|
Width() |
Sets the width of the igRadialMenu. |
Height() |
Sets the height of the igRadialMenu. |
Items() |
Used to add igRadialMenu items. |
To complete the procedure, you need the following:
Infragistics.Web.Mvc.dll assembly added to the application project. For details, refer to the Adding Control to an MVC Project topic.The Infragistics.Web.Mvc namespace added to the ASP.NET MVC View
In ASPX:
<%@ Import Namespace="Infragistics.Web.Mvc" %>
Reference to the combined JavaScript files for all data visualization controls and to the required CSS files added to the
tag of the APS.NET MVC View
In ASPX:
<%@ Import Namespace="Infragistics.Web.Mvc" %>
<!DOCTYPE html>
<html>
<head>
<title>BulletGraph</title>
<link href="<%=Url.Content("~/Scripts/css/themes/infragistics/infragistics.theme.css")%>" rel="stylesheet"></link>
<link href="<%=Url.Content("~/Scripts/css/structure/infragistics.css")%>" rel="stylesheet"></link>
<script src="<%=Url.Content("~/Scripts/jquery.min.js")%>" type="text/javascript"></script>
<script src="<%=Url.Content("~/Scripts/jquery-ui.min.js")%>" type="text/javascript"></script>
<script src="<%=Url.Content("~/Scripts/js/infragistics.core.js")%>" type="text/javascript"></script>
<script src="<%=Url.Content("~/Scripts/js/infragistics.dv.js")%>" type="text/javascript"></script>
Additionally there are a couple of other ways of adding igRadialMenu:
igRadialMenu-related files, explicitly, as explained in the Adding igRadialMenu to an HTML Page topicFollowing are the general conceptual steps for adding igRadialMenu to an ASP.NET MVC Application.
Add the ASP.NET MVC Helper.
Instantiate the igRadialMenu control configuring its basic rendering options.
Add a button item (optional)
Add a color item (optional)
Add a numeric gauge item (optional)
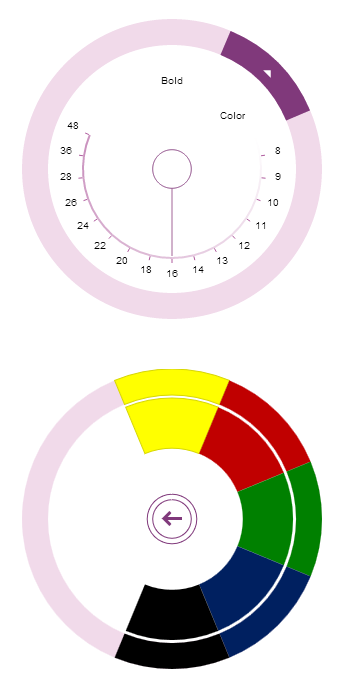
This procedure uses the ASP.NET MVC helper to add an instance of igRadialMenu to an ASP.NET MVC application to control and configure its dimensions and include several menu items.
The following screenshot is a preview of the result with all optional steps completed.

An ASP.NET MVC application configured with the required JavaScript files, CSS files and ASP.NET MVC assembly as defined in the Prerequisites of the Adding igRadialMenu to an ASP.NET MVC Application procedure.
The following steps demonstrate how to instantiate igRadialMenu in an ASP.NET MVC application using the Ignite UI for MVC HTML helper.
Add the ASP.NET MVC Helper
Adds the helper to the body of your ASP.NET page.
In ASPX:
 <body>
 @(Html.Infragistics().RadialMenu()
     .Render()
 )
 </body>
Instantiate the igRadialMenu control configuring its basic rendering options.
Instantiates the igRadialMenu control. As with all Ignite UI for MVC controls, you must call the Render method to render the HTML and JavaScript to the View.
In ASPX:
 <body>
 @(
     Html.Infragistics().RadialMenu()
     .Width("300px")
     .Height("300px")
     .Render()
 )
 </body>
Add a button item (optional)
Defines a button item in the igRadialMenu.
In ASPX:
 <body>
 @(Html.Infragistics().RadialMenu()
 …
     .Items(i =>
     {
         i.Item("button1")
         .Header("Bold")
         .ClientEvent(new Dictionary<string, string>() {
           { "click", "function(evt, ui) { alert('Bold clicked'); }" }
           });
     })
 .Render()
 )
 </body>
Add a color item (optional)
Defines a color item with color well Sub-Items in the igRadialMenu.
In ASPX:
 <body>
 @(Html.Infragistics().RadialMenu()
     …
     .Items(i =>
     {
         i.ColorItem("colorItem1")
         .Header("Color")
         .Items(si =>
         {
             si.ColorWell().Color("#FFFF00");
             si.ColorWell().Color("#C00000");
             si.ColorWell().Color("#008000");
             si.ColorWell().Color("#002060");
             si.ColorWell().Color("#000000");
         });
     })
     .Render()
     )
 </body>
Add a numeric gauge item (optional)
Define a numeric gauge item in the igRadialMenu.
In ASPX:
 <body>
 @(Html.Infragistics().RadialMenu()
 …
     .Items(i =>
     {
         i.NumericGauge("numGauge1")
         .WedgeSpan(5)
         .Ticks(new double[] {8,9,10,11,12,13,14,16,18,20,22,24,26,28,36,48})
         .Value(16);
     })
     .Render()
 )
 </body>
Following is the full code for this procedure.
In ASPX:
<%@ Import Namespace="Infragistics.Web.Mvc" %>
<!DOCTYPE html>
<html>
<head>
    <title>BulletGraph</title>
    <link href="<%=Url.Content("~/Scripts/css/themes/infragistics/infragistics.theme.css")%>" rel="stylesheet"></link>
    <link href="<%=Url.Content("~/Scripts/css/structure/infragistics.css")%>" rel="stylesheet"></link>
    <script src="<%=Url.Content("~/Scripts/jquery.min.js")%>" type="text/javascript"></script>
    <script src="<%=Url.Content("~/Scripts/jquery-ui.min.js")%>" type="text/javascript"></script>
    <script src="<%=Url.Content("~/Scripts/js/infragistics.core.js")%>" type="text/javascript"></script>
    <script src="<%=Url.Content("~/Scripts/js/infragistics.dv.js")%>" type="text/javascript"></script>
</head>
<body>
<%=
Html.Infragistics().RadialMenu()
.ID("rMenu")
.Width("300px")
.Height("300px")
.Items(i =>
{
  i.Item("button1")
    .Header("Bold")
    .ClientEvents(new Dictionary<string, string>() {
      { "click", "function(evt, ui) { alert('Bold clicked'); }" }
    });

  i.ColorItem("colorItem1")
    .Header("Color")
    .Items(si =>
    {
      si.ColorWell().Color("#FFFF00");
      si.ColorWell().Color("#C00000");
      si.ColorWell().Color("#008000");
      si.ColorWell().Color("#002060");
      si.ColorWell().Color("#000000");
    });

  i.NumericGauge("numGauge1")
    .WedgeSpan(5)
    .Ticks(new double[] {8,9,10,11,12,13,14,16,18,20,22,24,26,28,36,48})
    .Value(16);
})
.Render()
%>
</body>
</html>
The following topics provide additional information related to this topic.
Adding igRadialMenu to an HTML Page: This topic demonstrates, with code examples, how to add the igRadialMenu control to an HTML page.
igRadialMenu Configuration Overview: This topic explains how to configure the igRadialMenu control.
View on GitHub